Six steps to create a highly available Apache Web service
When a Red Hat cluster goes into production, you can protect it by configuring a supported high-availability service. Here's how.

After setting up a cluster using the Red Hat Enterprise Linux High Availability Add-On and ensured integrity in the cluster with quorums and fencing, it's time to take that cluster into production and add Apache Web services.
To ensure high availability, choose supported services that have a script that enables them to work in the cluster. RHEL High Availability Add-On supports several services, including the Apache Web Server. Usually high-availability covers the service itself, an IP address and a location where configuration file and data for the service are stored. The purpose is to design an environment in which the Apache Web Server is constantly running.
To define a service in the cluster, make sure the cluster manages all required parts. In the case of an Apache Web Server that fails over, be sure the Web server can be reached no matter where it's hosted. You'll need a unique IP address for the Apache Web Server that fails over and is activated before restarts.
Your Web server also needs access to its document root, which contains the files that the Web server offers. To keep these data files available, no matter which node the Web server is running, create a shared file system and ensure it's mounted on the node that runs the Web server. Now you can start running the Web server.
Configuring services in a Red Hat cluster
Configuring an Apache Web service for a high-availability cluster differs from setting up a standalone service. For example, the service needs access to a configuration file, which has to be the same on all nodes where you want to run it. Put it on shared storage or synchronize it with a program like rsync.
Red Hat provides numerous scripts to configure services in an RHEL cluster. These scripts are in the directory /usr/share/cluster. Services that have a cluster script are available as resources in the Web-based management interface. For everything that's not available by default, use the script /usr/share/cluster/script.sh. You can modify this generic script to run any service you want in the cluster.
To create a service for Apache Web Server in the cluster, add the resources for the individual parts of the service: the IP address, the shared file system and the cluster service. Once created, put the resources together in the service and start running it in the cluster. To create an ext4 file system with the label "ApacheFS" on the shared storage device, accessible by all nodes, follow the six steps below.

1. Open the Web-based cluster management interface (https://your.management.service:8043), select Resources and click Add. From the Resource Type dropdown list, select IP Address. You'll use this resource to add a unique IP address to the cluster, so you must make sure nothing else in the network is using the IP address. Once this is completed, enter the IP address in the properties window and the number of bits to use in the network mask, and click Submit to write it to the cluster.
2. From the Web management interface, click Resources -> Add. From the Resource Type dropdown list, select Filesystem.
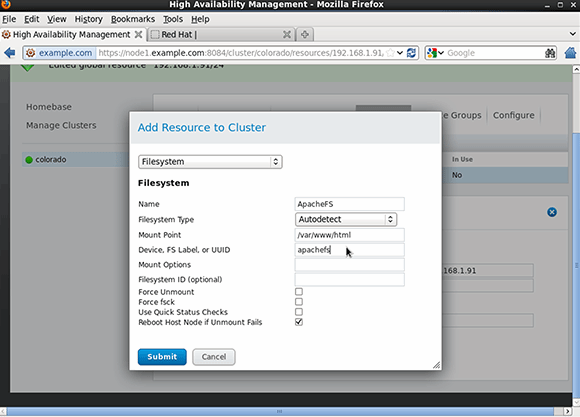
First, you'll need to give the resource a name -- here, it is "ApacheFS" -- to make it easier to identify it in the cluster. Leave the Filesystem Type as Autodetect and set the mount point to /var/www/html, the default location for the Apache document root. Next, specify the device name, file system (FS) label or universally unique identifier (UUID). The name of the device can change, so use something more persistent, like the file system label "ApacheFS."
Enter this label in the Device, FS Label or UUID field. Everything else is optional, but it's a good idea to select the Reboot host if Unmount fails option to ensure the file system resource will be available at all times. After entering all these parameters, click Submit to write it to the cluster. Now you can create the resource for the Apache Web Server.
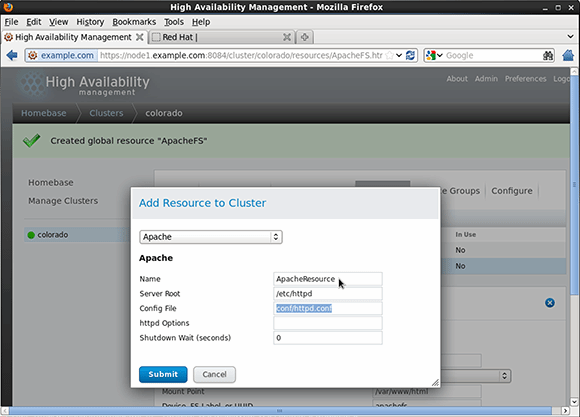
3. From the Web management interface, select Resources and click Add and select the resource type Apache. Next, give it a unique name. The default settings for the Server Root and Config File will work for a standard setup.
The cluster now manages parameters that are typically in the Apache configuration. This should make it easier to specify an alternative location for the Apache configuration, such as a location that's on a shared file system in the cluster. After verifying your setup, click Submit to write the configuration to disk. Now that you've created all the resources you need, it's time to add them to a service group.
4. From the Conga management interface, click Service Group -> Add to add a new service group to the cluster. Name the group ("Apache" makes sense) and select the option to automatically start the service. You can leave the other service group parameters as they are, but you need to add resources.
Click Add Resource and select the IP address resource you created earlier. The resource with all its properties is now included in the service group. Next, click Add Resource again and enter the file system resource. If you want to create a dependency between resources, use Add Child Resource instead. With this approach, the child resource will never start if the parent resource is not available. This isn't necessary with the Apache Service Group.
Add the Apache resource and click Submit to write the configuration to the cluster. You're now back to the top of the Service Groups screen, where you can see the properties of the Service Group. Verify that everything is correct.
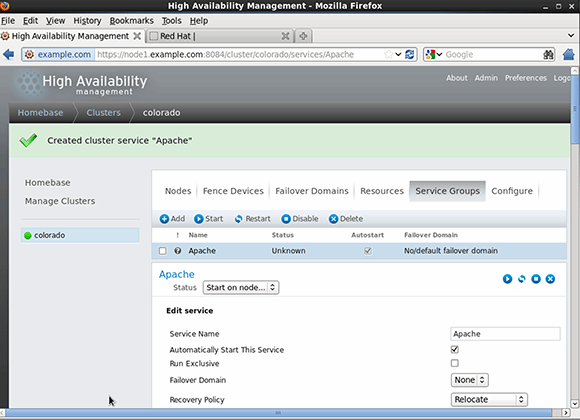
5. To test your configuration, select Service Group and click Start. Be aware that the status information as shown in the Web management interface isn't always correct.
6. Use clustat on both nodes to see the status of your cluster service.
Now you have a highly available Apache Web service. Use this same procedure to configure other services as highly available.
About the author:
Sander van Vugt is an independent trainer and consultant based in the Netherlands. He is an expert in Linux high availability, virtualization and performance. He has authored many books on Linux topics, including Beginning the Linux Command Line, Beginning Ubuntu LTS Server Administration, Red Hat Enterprise Linux 6 Administration and The Definitive Guide to SUSE Linux Enterprise Server.