Oracle on RHEL 5: Installation and configuration
Install and configure Oracle 10 on RHEL 5. This tip shows how to set up a database with Oracle's Database Configuration Assistant (DBCA) and Oracle Enterprise Manager.
Oracle has emerged as a major competitor in the enterprise Linux market after a major Linux migration effort in 2004. Offering support contracts for certain Linux distributions in the past year and putting the finishing touches on their own Linux distribution, Oracle Enterprise Linux, Oracle has demonstrated that it is serious about Linux and would like to muscle in on RHEL's market share.
Red Hat is clearly the leader in today's enterprise Linux market and Oracle is clearly the leader in the database market. Put them both together, and you have two very powerful systems that work well together. This article shows how to install and configure Oracle10 in a RHEL5 environment.
We'll be working with RHEL5 x64, server release 5.1 (Tikanga) and Oracle 10gR2 64 bit; on an Intel Xeon HS20 for BladeCenter , Intel(R) Xeon(TM) CPU 3.60GHz environment.
Installing Oracle on RHEL
Let's start out with the basics and make sure that the hosts file has the fully qualified domain name. Oracle likes this.
 [oracle


 -->

 -->

 -->

 -->

 -->

 -->

 -->

 -->

 -->

 -->

 -->

 -->

 -->

 -->

 -->

 -->

 -->

 -->

 -->

 _29_140_62 database]$ hostname 172_29_140_62.dal-ebis.ihost.com [oracle@172_29_140_62 database]$ more /etc/hosts # Do not remove the following line, or various programs # that require network functionality will fail. 127.0.0.1 xbc02b06 localhost.localdomain localhost ::1 localhost6.localdomain6 localhost6 172.29.140.62 172_29_140_62.dal-ebis.ihost.com 172_29_140_62 [oracle@172_29_140_62 database]$
Before you download Oracle, please confirm the kernel mode:
[root@172_29_140_62 /]# uname -mi x86_64 x86_
This command prints the hardware platform and machine name. It also validates that we need to download the 64 bit x86 version, which we can get directly from Oracle. After unzipping it to the box and imploding it with cpio, follow the instructions which are listed in the download section. When the directories are finished imploding, we are ready to move on.
Let's make sure SELinux is disabled:
[oracle@172_29_140_62 database]$ cat /etc/selinux/config | grep SELINUX # SELINUX= can take one of these three values: SELINUX=disabled
We can then create our users and groups:
# groupadd oinstall # groupadd dba # groupadd oper # useradd –g oinstall –G dba oracle
Make sure the following packages are installed prior to the install. Not all of them are required, but Oracle recommends you do this prior to installation on RHEL5.
binutils-2.17.50.0.6-2.el5 compat-gcc-34-3.4.6-4 compat-gcc-34-c++-3.4.6-4 compat-libstdc++-33-3.2.3-61 compat-libstdc++-33-3.2.3-61(i386) control-center-2.16.0-14.el5 gcc-4.1.1-52.el5 gcc-c++-4.1.1-52.el5 gdbm-1.8.0-26.2.1 glibc-2.5-12 glibc-common-2.5-12 glibc-devel-2.5-12 glibc-devel-2.5-12(i386) libgcc-4.1.1-52.el5(i386) libgcc-4.1.1-52.el5(x86_64) libgnome-2.16.0-6.el5 libstdc++-devel-3.4.3-22.1 libXp-1.0.0-8.i386 make-3.81-1.1 sysstat-7.0.0-3.el5.x86_64.rpm util-linux-2.13-0.44.e15.x86_64
Now we are ready for the installation. If you are not going to do the install from a GUI console, you will need to have X installed on your PC. I've found that one of the better open source (and free) X servers is Cygwin/X. If you choose to install X, you can start it up this way: Start > freeXer> XWin Xserver. You also need to enable X11 forwarding from your SSH client. I used PuTTY (another free download) for this exercise. To use PuTTY, go to: SSH > Tunnels, then highlight the box that says enable X11 forwarding. If your display is not set properly, you will never be able to install Oracle, as the character based option disappeared about a decade ago.
Log in as oracle (the installer will not run as root.)
[oracle@172_29_140_62 database]$ ./runInstaller Starting Oracle Universal Installer... Checking installer requirements... Checking operating system version: must be redhat-3, SuSE-9, redhat-4, UnitedLinux-1.0, asianux-1 or asianux-2 Passed All installer requirements met. Preparing to launch Oracle Universal Installer from /tmp/OraInstall2007-12-09_10-19-30AM. Please wait ...[oracle@172_29_140_62 database]$

At the first screen, you have the option of creating a database or performing an advanced installation. We will chose the default and let Oracle create a database for us. Enter a password (remember it, we'll need it later) and then keep going.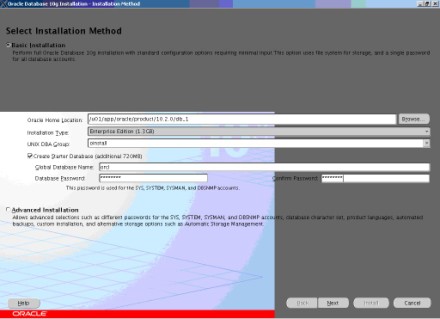
As we move forward with the install, we will need to specify an inventory director and the credentials. Doing this automatically sets up subdirectories for each product, which contains inventory information.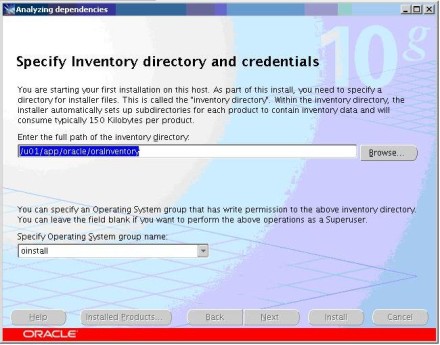
When this is completed, the installer will verify that the kernel parameters are configured appropriately. In our case, there are several parameters which have not yet been changed, and we are warned of them.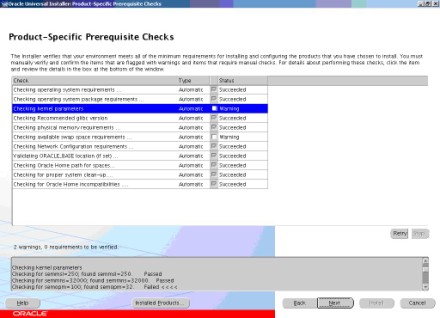
Here are the parameters that you need to change:
kernel.shmmni = 4096 kernel.sem = 250 32000 100 128 net.ipv4.ip_local_port_range = 1024 65000 net.core.rmem_default=262144 net.core.rmem_max=262144 net.core.wmem_default=262144 net.core.wmem_max=262144
Just append them to the end of /etc/sysctl and run sysctl –p to make the changes to the /etc/sysctl.conf file available in the active kernel memory.
[root@172_29_140_62 ~]# sysctl -p net.ipv4.ip_forward = 0 net.ipv4.conf.default.rp_filter = 1 net.ipv4.conf.default.accept_source_route = 0 kernel.sysrq = 0 kernel.core_uses_pid = 1 net.ipv4.tcp_syncookies = 1 kernel.msgmnb = 65536 kernel.msgmax = 65536 kernel.shmmax = 68719476736 kernel.shmall = 4294967296 kernel.shmmni = 4096 kernel.sem = 250 32000 100 128 net.ipv4.ip_local_port_range = 1024 65000 net.core.rmem_default = 262144 net.core.rmem_max = 262144 net.core.wmem_default = 262144 net.core.wmem_max = 262144 [root@172_29_140_62 ~]#
The install notifies us that the system is lacking in swap space.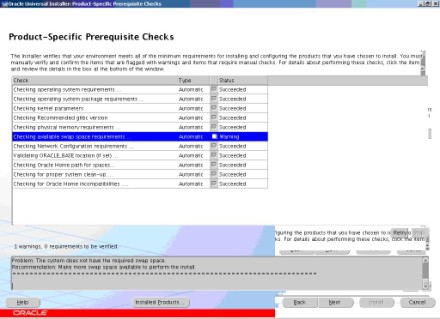
I tried to add some more. You can partition your disk for adding filesystems by using either fdisk or parted. I prefer parted.
[root@172_29_140_62 ~]# parted GNU Parted 1.8.1 Using /dev/sda Welcome to GNU Parted! Type 'help' to view a list of commands. (parted) print Model: IBM-ESXS ST973401LC FN (scsi) Disk /dev/sda: 73.4GB Sector size (logical/physical): 512B/512B Partition Table: msdos Number Start End Size Type File system Flags 1 32.3kB 107MB 107MB primary ext3 boot 2 107MB 19.0GB 18.9GB primary ext3 3 19.0GB 20.0GB 1045MB primary linux-swap
Unfortunately, I did not have any more space in which to add swap. My rule of thumb is to give swap ½ the amount of RAM, that is if you have it to give. I ignored the this warning and moved forward. After your system is running and being utilized, I would monitor the system to determine if you really do need additional swap. This part of the install can take awhile, but the progress tracker is very helpful.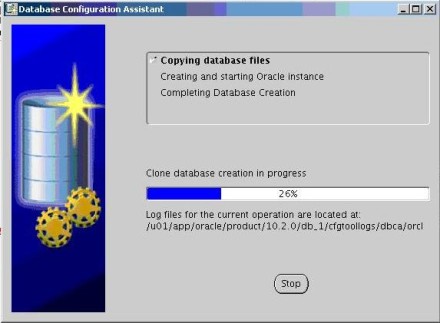
After this complete, the install wants you to run several scripts.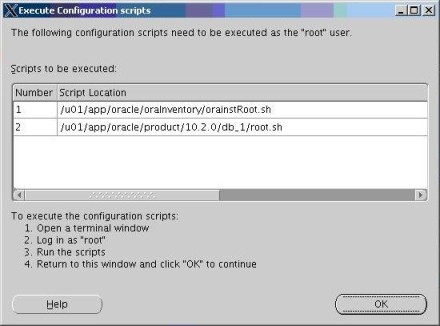
You must run these scripts as root. The first script is orainstRoot.sh
[root@172_29_140_62 oraInventory]# ./orainstRoot.sh Changing permissions of /u01/app/oracle/oraInventory to 770. Changing groupname of /u01/app/oracle/oraInventory to oinstall. The execution of the script is complete [root@172_29_140_62 oraInventory]#
The second script is root.sh:
[root@172_29_140_62 db_1]# ./root.sh Running Oracle10 root.sh script... The following environment variables are set as: ORACLE_OWNER= oracle ORACLE_HOME= /u01/app/oracle/product/10.2.0/db_1 Enter the full pathname of the local bin directory: [/usr/local/bin]: Copying dbhome to /usr/local/bin ... Copying oraenv to /usr/local/bin ... Copying coraenv to /usr/local/bin ... Creating /etc/oratab file... Entries will be added to the /etc/oratab file as needed by Database Configuration Assistant when a database is created Finished running generic part of root.sh script. Now product-specific root actions will be performed. [root@172_29_140_62 db_1]#
That's pretty much it. On the GUI, click next and it will continue until finished.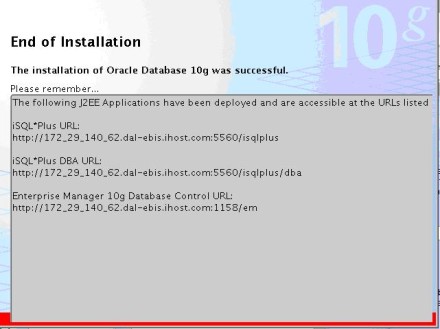
Configuration of Oracle on RHEL
Now, we use the Database Configuration Assistant (DBCA), a graphical user interface that interacts with the Oracle Universal Installer, to configure our Oracle software on RHEL 5.
[oracle@172_29_140_62 database]$ dbca
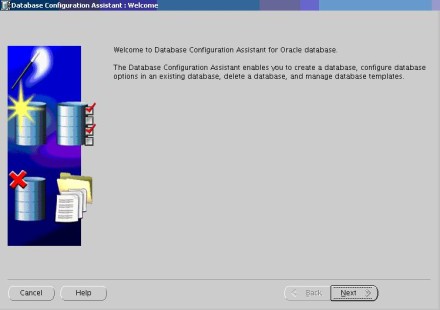
From here, you can create and delete databases, configure your options, manage templates and configure automatic storage management.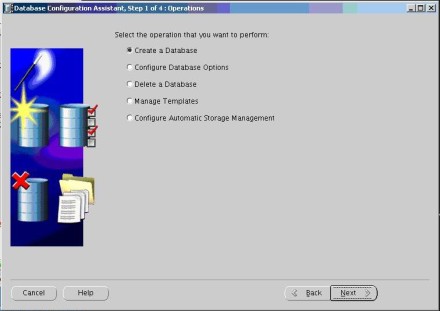
I chose the configure option, because I wanted to put the database in shared server mode. The default is dedicated server mode, which is better for a DB with a small amount of users.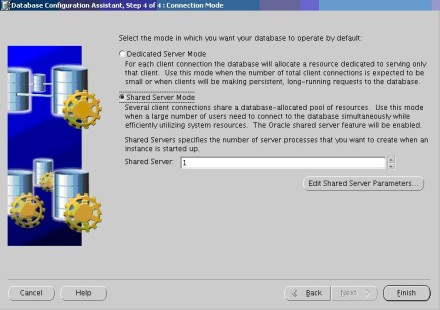
After changing the default, click finish.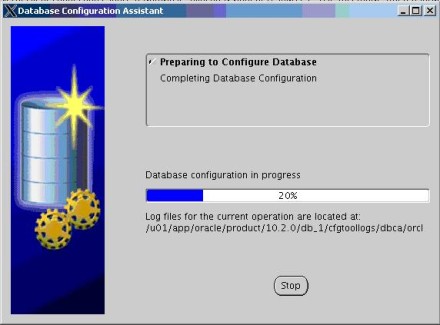
Another GUI to work with in Oracle is the Oracle Enterprise Manager (OEM). I highly recommend that you get this working in your environment. To set this up properly, follow these steps:
- First login in as the oracle user
- Make sure that you set the correct ORACLE_SID reflects the database that you think you're setting it to. If not, then export the correct ORACLE_SID.
# export ORACLE_SID=orcl
- Start up OEM
-
[oracle@172_29_140_62 db_1]$ emctl start dbconsole TZ set to US/Central Oracle Enterprise Manager 10g Database Control Release 10.2.0.1.0 Copyright (c) 1996, 2005 Oracle Corporation. All rights reserved. http://172_29_140_62.dal-ebis.ihost.com:1158/em/console/aboutApplication Starting Oracle Enterprise Manager 10g Database Control ............................. started. ------------------------------------------------------------------ Logs are generated in directory /u01/app/oracle/product/10.2.0/db_1/172_29_140_62.dal-ebis.ihost.com_orcl/sysman/log
- Bring up your browser
-
[oracle@172_29_140_62 db_1]$ [oracle@172_29_140_62 ~]$ firefox & [1] 16721 [oracle@172_29_140_62 ~]$
- Type in the correct url
- You must use the url template below; substituting your fully qualified hostname for yourhostname below. If there is a typo, you'll get the infamous "page cannot be displayed" message.
http://yourhostname:1158/em
At this point, we're almost in.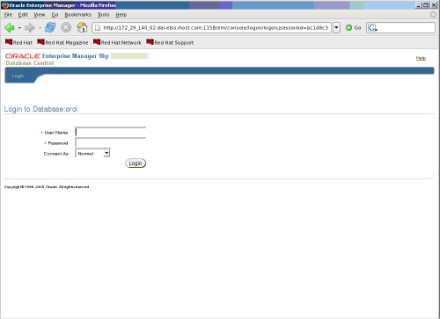
After logging in as SYS as SYSDBA (I hope you remembered the password that you set up during your install for the database, you'll see this screen: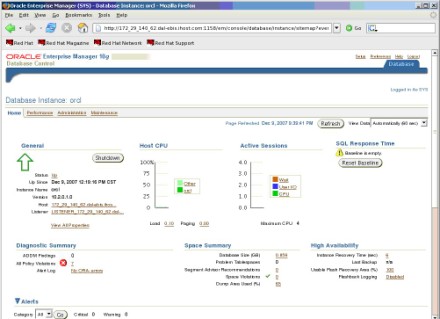
Let's take a quick look at the performance section, which drills down into the Database.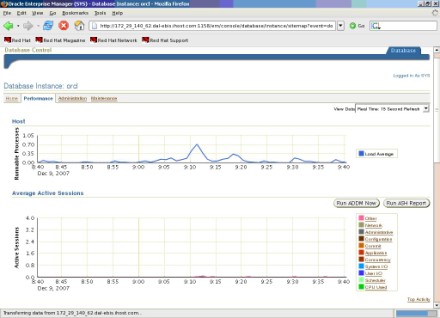
If you're more of a DBA than a systems administrator, you'll probably spend more time with sqlplus. To enter that utility, just type in sqlplus as the oracle user.
[oracle@172_29_140_62 database]$ sqlplus SQL*Plus: Release 10.2.0.1.0 - Production on Sun Dec 9 12:24:30 2007 Enter user-name:
When installing and configuring Oracle, use the documentation that is readily available to you. The release notes for installations on Linux contain the most pertinent information. I strongly recommend that you read. Please also be certain that you satisfy the prerequistes prior to installation, so that you won't run into issues like I did during the install. Don't forget to start up X if you plan on doing an installation and configuration of Oracle anywhere else but the console. Finally, use the tools that are available to you, such as the Oracle Database Creation Assistant and Oracle Enterprise Manager. Even experienced DBAs use OEM because of the options it makes available. You may also want to look into some open source tools (licensed under the GPL), such as the TOra Toolkit for Oracle.
About the author: Ken Milberg is a systems consultant with two decades of experience working with Unix and Linux systems. He is a SearchEnterpriseLinux.com Ask the Experts advisor and columnist.