How to prepare a server cluster for Linux high availability
With a Linux distribution supporting mission-critical business applications, it's time to set up Linux high-availability software.

Linux high availability is a must when the platform supports mission-critical applications, which is increasingly the case in enterprise data centers.
Red Hat Enterprise Linux (RHEL) 6 offers the Red Hat High Availability add-on, while Pacemaker will be the default cluster solution in Red Hat Enterprise Linux 7 (general availability in late 2013). The Linux High Availability add-on is available as a separate purchase for RHEL, but it can also be used for free on CentOS or Fedora distributions.
Hardware requirements
To enable high availability (HA), you need a minimum of two servers that are connected on a direct nonrouted local area network connection. Ideally, a second network connection separates the cluster traffic from normal network traffic. Shared storage in the cluster gives each server access to the data, keeping the resource available even if a host server fails. Use a Network File System (NFS) share, network-attached storage (NAS) or a storage area network (SAN), depending on the HA cluster's requirements.
Linux cluster environments also typically use a fencing device: an external hardware device that can switch off a machine that the cluster can no longer reach. A fencing device guarantees the integrity of file system resources; if two servers accessed a file system at the same time, it could corrupt the file system. Remote management boards, such as HP Integrated Lights-Out or Dell Remote Access Controller, are often deployed, as are external power distribution units such as APC MasterSwitch or the power switch included in Cisco Unified Computing System.
Software requirements
Use Conga, the Web-based cluster management environment for Red Hat, to set up your Linux high-availability cluster.
Before you start the cluster configuration, switch off the NetworkManager service using service NetworkManager stop and chckconfig NetworkManager off.
Install ricci, the agent software that must be available on all nodes in the cluster. Use yum install -y ricci, service ricci start and chkconfig ricci on on all servers in the cluster. Provide a password for the user ricci on all nodes.
The LuCI Web interface allows you to manage the cluster. Ideally, run LuCI on a node that is not a part of the cluster, or on multiple nodes in the cluster. Use yum install luci then service luci start to start it. While LuCI starts for the first time, a public key-private key pair is generated and installed. The name of this certificate is /var/lib/luci/certs/hosts.pem and it is referred to in the configuration file /var/lib/luci/etc/cacert.config. To replace these certificates with certificates that are signed by an external certification authority, copy the host certificate to the /var/lib/luci/certs directory. After generating the certificates, LuCI will start and offer its services on HTTPS port 8084.
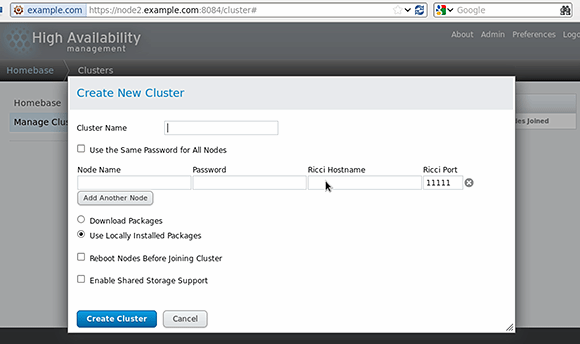
To create a cluster, connect to the luci management interface via https://yourserver:8084 in a browser. Ignore the certificate warning and log in using your root credentials. Create a cluster by clicking Manage Cluster and Create. This opens the Create New Cluster interface (see Figure 1).
In the Create New Cluster dialogue, pick a name for your new cluster. Anything goes, as long as it isn't longer than 15 characters and it's not cluster. Next, specify the nodes that will be in the cluster and provide your ricci password, which should be the same at all nodes. Node Name is the normal node name of the cluster. If your cluster is configured to use a dedicated network for cluster traffic, use the name of the host on that specific network as the Ricci Hostname. By default, you'll see one line to add nodes and will need to click Add Another Node and specify the name and ricci password of that node.
If you want the cluster nodes to download all updates for cluster packages, select Download Packages. If you don't, you can just leave the Use Locally Installed Packages option. In both cases, required software will be installed anyway.
The option Reboot Nodes Before Joining Cluster isn't really necessary, but does ensure that the nodes are capable of booting with cluster support.
If you're planning to use a cluster-aware file system such as Red Hat GFS, select Enable Shared Storage Support so that the necessary packages are installed.
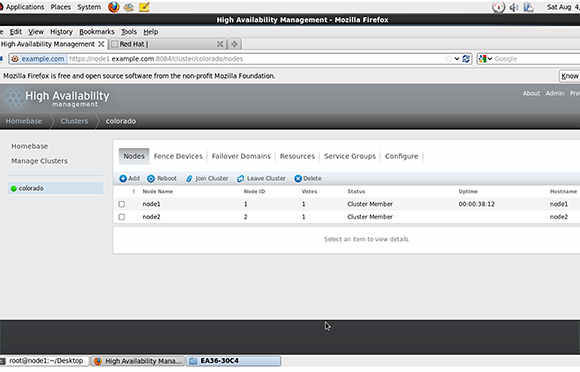
After entering all parameters, click Create Cluster to start the cluster creation; it will take a while. The cluster has been created successfully, and all nodes have been able to join the cluster (see Figure 2).
About the author:
Sander van Vugt is an independent trainer and consultant based in the Netherlands. He is an expert in Linux high availability, virtualization and performance. He has authored many books on Linux topics, including Beginning the Linux Command Line, Beginning Ubuntu LTS Server Administration and Pro Ubuntu Server Administration.